


This movie shows examples of centrifugal instability in a 20 cm diameter by 20 cm deep cylindrical tank of water situated on a DJ turntable. We spin up the tank of water so that all the water is in solid body rotation. Then we slow down the rotation rate. The fluid adjacent to the tank boundaries slows with the tank and the interior fluid maintains its original speed. The faster interior fluid then centrifuges its way outwards into the slowly fluid on the sidewall. The occurs in the form of centrifugal rolls. The rheoscopic fluid that is added to the water allows this instability to be nicely visualized.


We take it to the next level here in our ongoing series of DIY coffee & tea experiments. How? By showing how curdled soy creamer dynamically separates from coffee, forming a classic compaction front. The editing goes a little crazy from about 0:45 - 0:55. Not sure what exactly happened there. Rest of the movie is a mix of disgusting soy-tofu flakes and cool dynamics. Try it at home, if you so dare...
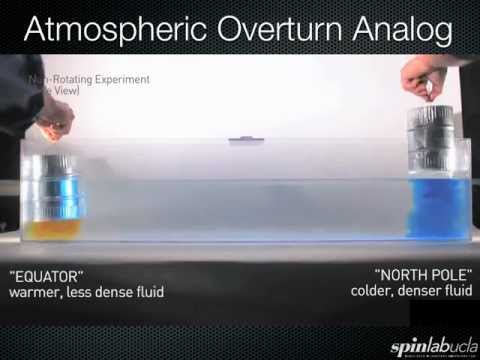

Laboratory demonstration showing basic process of atmospheric overturn in a rotating channel. Heavier dye sinks at one side of the channel, whereas less dense dye rises at the other end. Instead of uniformly spreading along the top and bottom surfaces, the dye patches are now deflected off to the right of their non-rotating paths by Coriolis accelerations. This demonstration qualitatively explains the latitudinally-oriented flows (e.g., easterly/westerly flows) associated with the atmosphere's overturning Hadley cell. (It is also not too shabby of a fluid mechanical analog to the Hall Effect.)


In Newton’s famous bucket experiment, water in a spinning container doesn’t stay level — instead, its surface rises at the edges and sinks in the middle, forming a paraboloid. This shape isn’t a coincidence: it’s the natural ‘flat’ surface in a rotating frame, just as a sphere is ‘flat’ under a planet’s radial gravity. In this video, we explore why the paraboloid appears, what it tells us about rotation, and how it connects to the idea of gravitational equipotential surfaces. ------------------------------------------------------------------------------------------------------------------------------------------------------------------ The Origins of Newton’s Bucket: Newton’s Bucket gets its name from Isaac Newton’s famous experiment, described in his Principia. When a bucket of water is spun, the surface curves into a paraboloid – when the water and bucket rotate together. Newton used this simple setup to argue that the effect comes from motion relative to absolute space, not just relative motion between objects. This idea sparked centuries of debate about the nature of space and motion.

Learn how three simple processes give rise to the rich dynamics of rotating fluids, from hurricanes on Earth to Jupiter's Great Red Spot, all connected by the concept of a timescale.

This video shows bubble tornadoes formed in our DIYnamics HT3 rotary table. By dropping Alka-Seltzer tablets into a fluid in rigid-body rotation, we create tornado-like vortices. These impressively stunning vortices are visible in the form of helical spiraling bubble columns.

Have you ever heard of rivers in the sky? In this video, we dive into the science of Atmospheric Rivers (ARs) -- long, narrow bands of concentrated water vapor that transport huge amounts of moisture from the tropics to the mid-latitudes. These “rivers” play a major role in shaping winter weather, especially for places like Los Angeles, where occasional bursts of rain often come from ARs traveling across the Pacific. I’ll walk you through what atmospheric rivers are, how they form, and why they matter -- using both real satellite data and a hands-on lab demonstration you can recreate with simple materials. With a rotating tank, some ice and water, food coloring, and a Lego motor, we build a tabletop model of Earth’s atmosphere that shows how warm, moist air gets swept along fast-moving storm systems to create AR-like filaments. We’ll compare the experiment to actual satellite imagery from January 2023, and see how these rivers of vapor can bring major rainfall to California and beyond. It’s a simple but powerful way to visualize the leading-order dynamics of our planet’s weather -- right on a desk.

This is a version of the video showing baroclinic instability (11 RPM) in our paper "Low-cost table-top experiments for teaching multi-scale geophysical fluid dynamics" published in Frontiers in Marine Science (doi: 10.3389\fmars.2023.1192056).


The LEGO-Based Tables are powered by batteries driving the motor at a constant speed. The External Power Supply add-on enables driving the motor using wall power and provides the ability to make fine adjustments to rotation rate. These features are beneficial for experiments such as Taylor Columns that require either a low rate of rotation or precisely changing speed mid-experiment. Disclaimer: Be careful with experiments involving wall power and water in close proximity. We include a GFCI in the required components for safety.


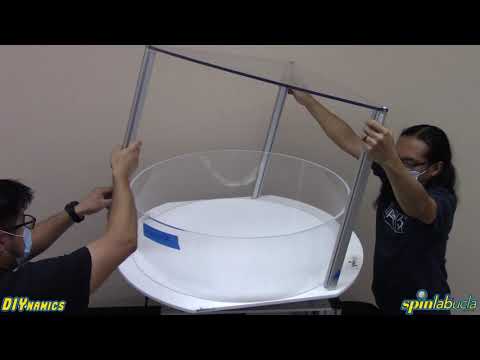
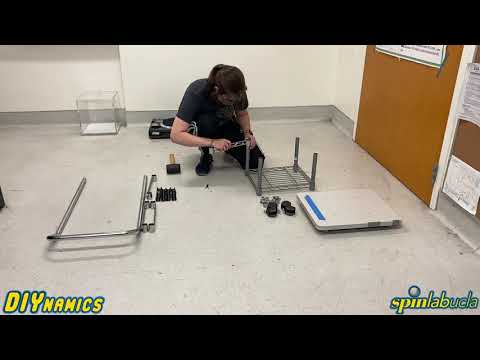
This is the introduction (aka, Part 0) to the "Build Series -- 2025 DIYnamics Desktop Rotating Table” set of videos, which walk the intrepid DIYnamicist through the construction and operation of the 2025 iteration of the desktop rotating fluid dynamics hardware kit.
Part 1 of the "Build Series -- 2025 DIYnamics Desktop Rotating Table” set of videos, which walk the intrepid DIYnamicist through the construction and operation of the 2025 iteration of the desktop rotating fluid dynamics hardware kit. Here, Bill Church shows how to set up the Zip Tie Beam that couples the motor assembly to the OXO turntable.

Part 2 of the "Build Series -- 2025 DIYnamics Desktop Rotating Table” set of videos, which walk the intrepid DIYnamicist through the construction and operation of the 2025 iteration of the desktop rotating fluid dynamics hardware kit. Here, Bill Church shows how to build the motor assemblly that rotates the OXO turntable.

Part 3 of the "Build Series -- 2025 DIYnamics Desktop Rotating Table” set of videos, which walk the intrepid DIYnamicist through the construction and operation of the 2025 iteration of the desktop rotating fluid dynamics hardware kit. Here, Bill Church shows how to set up modify the OXO turntable so that its possible to zip tie the motor assembly to the rim of the OXO turntable.

Part 4 of the "Build Series -- 2025 DIYnamics Desktop Rotating Table” set of videos. Here, Bill Church shows how to put together the 3-D printed parts for the motor adapter. With this adapter in hand, it becomes possible to control the LEGO motor with a standard DC power supply, greatly increasing the flexibility of the system. The STL file for 3D printing is linked below. However, if no 3D printing capabilities are on-hand, please do not hesitate to contact us.
